
Hefezopf – Braided sweet bread (+video)
The German sweet braided bread is easy to make. Traditionally made for special occasions this Hefezopf recipe could be a everyday breakfast treat.
Servings 15 slices
Calories 208kcal
Ingredients
- 1 egg medium, at room temperature
- 2 teaspoon instant yeast 7g, 1 sachet
- 250 ml milk lukewarm
- 500 g all purpose flour Germany type 550, UK bread flour, US all purpose flour
- 60 g granulated sugar
- 1 teaspoon salt
- 80 g butter
To decorate
- 3 tablespoon almond slices optional
Instructions
- Whisk the egg in a small bowl. Remove 1 tablespoon of the egg mixture and set aside in a separate bowl.1 egg
- Add the yeast to the lukewarm milk. Leave for the yeast to activate (approximately 10 minutes). You should see some small bubbles forming on the surface.2 tsp instant yeast, 250 ml milk
- Mix together the remaining egg, yeast-milk mixture, flour, butter, sugar, and salt. Knead with a dough hook using a hand or stand mixer for 5 minutes. Leave the dough to rest for 5 minutes, then knead again for another 5 minutes. (Total kneading time: 10 minutes).500 g all purpose flour, 60 g granulated sugar, 80 g butter, 1 tsp salt
- Cover the bowl with a kitchen towel and leave to rest for at least 1 hour.
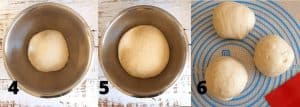
- After this time, the dough should have roughly doubled in size. Remove from the bowl and knead on a floured surface (or a non-stick baking mat) for about 5 minutes by hand.
- Divide the dough into three equal balls. Weigh the balls to ensure they are of equal size (about 260 g / 9 oz each).
- Roll each ball into a rope of equal length, approximately 40 cm (16 inches) long.
- Line a baking tray with parchment paper. This prevents you from having to move the bread after braiding. Place the dough ropes on the parchment paper and braid them into a plait. (See post for illustration).

- Cover the braid with a tea towel and leave to rise for 45 minutes.

- Preheat the oven to 180°C (356°F).
- Using a pastry brush cover the Hefezopf with the remaining whisked egg. Sprinkle the almonds on top. Place in the oven and bake for 30 minutes.3 tbsp almond slices
- Leave to cool before serving.
Video
Notes
I would recommend checking out the step-by-step pictures in the main post.
Prepare in advance.
Hefezopf tastes best when served fresh out of the oven. However, the most important step in this recipe is to give the dough enough time to rest. You can also leave the dough to rise in the fridge overnight. This can be done for the first or second rise. Just make sure that you place the dough in a container that gives the dough enough space to expand. It is important that you give the dough enough time to get back to room temperature before baking. So best to take it out of the fridge an hour or two before you are planning to bake it. Alternatively, you can bake in the evening before. Place it in a plastic bag, store it at room temperature and serve with some butter and jam. You will find it tastes yummy up to three days after it is baked.Baking with Yeast: Steps for Sucess
Baking with yeast is not rocket science. Here are my best tips to ensure that your yeast dough rises every time.- Use lukewarm milk. The microorganism in the yeast will activate through heat and sugar. The ideal temperature of the milk should be around 30-35°C / 86-95 °F. If the temperature rises above 45°C/113°F, the cells will die and your dough will not rise.
- Make sure your yeast is in-date. Using out of date yeast is a common reason for the dough not rising.
- 35°C/95 °F is the perfect temperature for the dough to rise. The temperature should not get hotter than 40 °C/104°F. If your kitchen is cooler, then preheat the oven to the lowest setting. Turn the oven off and place the dough in the oven. Cover it with a moist tea towel so it does not dry out. (If your lowest setting is hotter than 40 like mine 50, leave the door open for a couple of minutes before placing the dough in)
- Knead the dough thoroughly - To ensure that the bread becomes light and fluffy you need to knead it for a long time. A well-kneaded dough hardly sticks. After the dough rises it is important to knead it again, as during the rising process gas bubbles form. This will ensure that your bread bakes evenly.
Nutrition
Calories: 208kcal | Carbohydrates: 31g | Protein: 5g | Fat: 7g | Saturated Fat: 3g | Polyunsaturated Fat: 1g | Monounsaturated Fat: 2g | Trans Fat: 1g | Cholesterol: 24mg | Sodium: 205mg | Potassium: 88mg | Fiber: 1g | Sugar: 5g | Vitamin A: 176IU | Vitamin C: 1mg | Calcium: 35mg | Iron: 2mg
